블로그 이미지
분무기로 구름을 만들어 비가 내리다. 비내리는사막

카테고리

분류 전체보기 (28)
Cloud (9)
IT용어 (1)
뽐뿌 (1)
개인 (1)
Total
Today
Yesterday

달력

« » 2024.4
1 2 3 4 5 6
7 8 9 10 11 12 13
14 15 16 17 18 19 20
21 22 23 24 25 26 27
28 29 30

공지사항

최근에 올라온 글

AWS vs Azure 비교 자료

Cloud / 2018. 4. 3. 09:02

AWS 공식 자료 첨부 

첨부파일1 : 
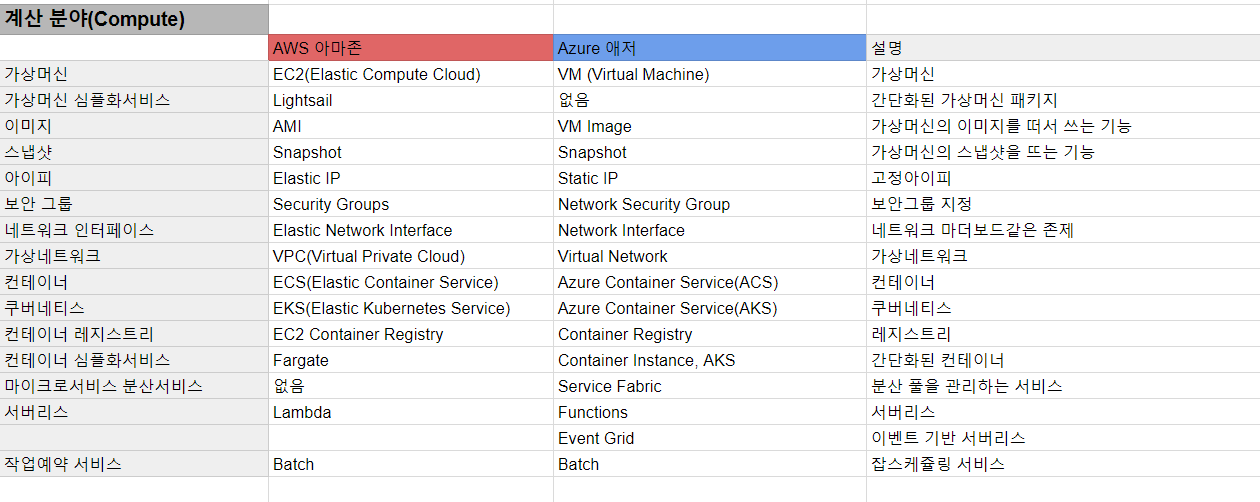
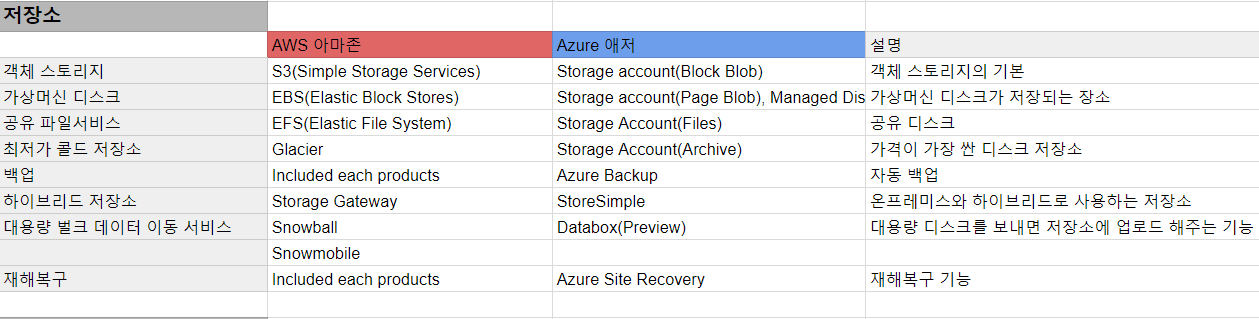
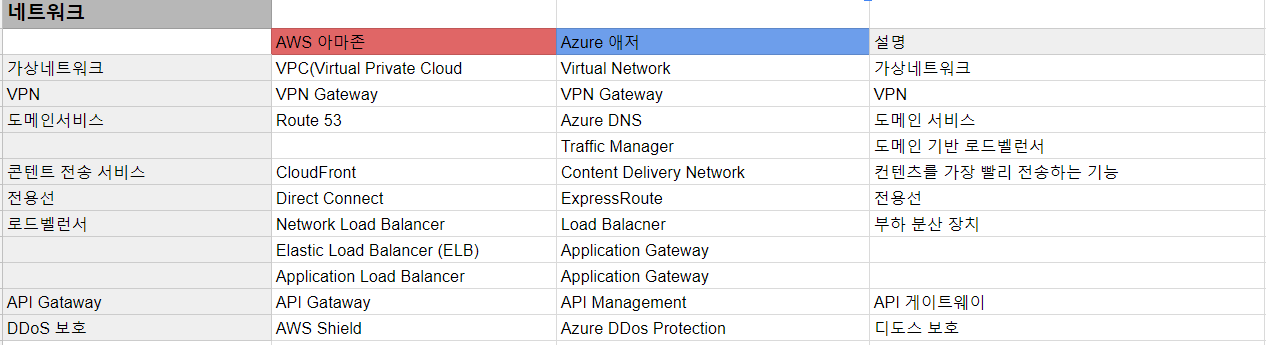
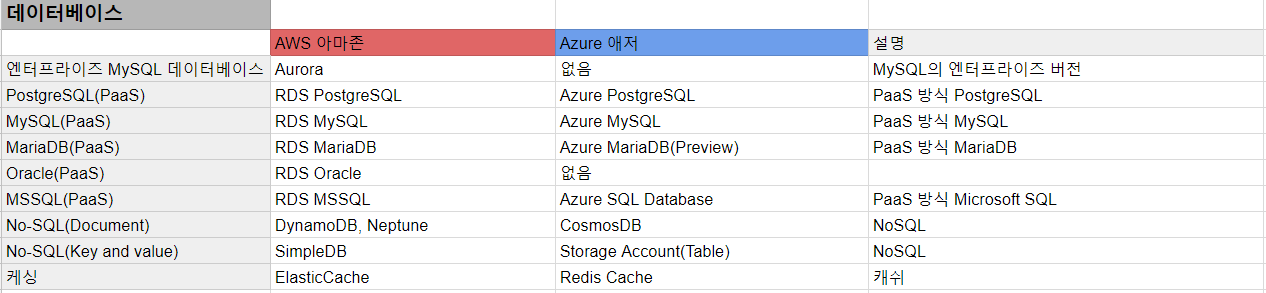
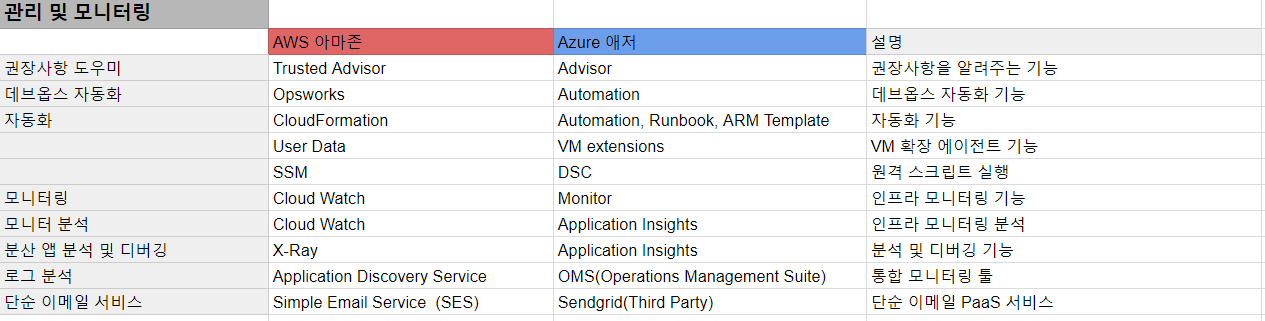
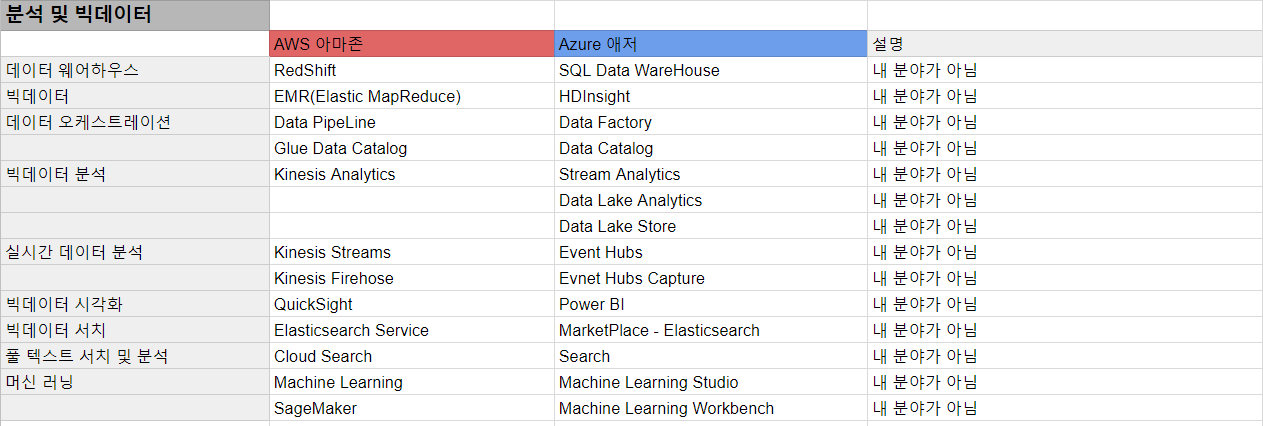
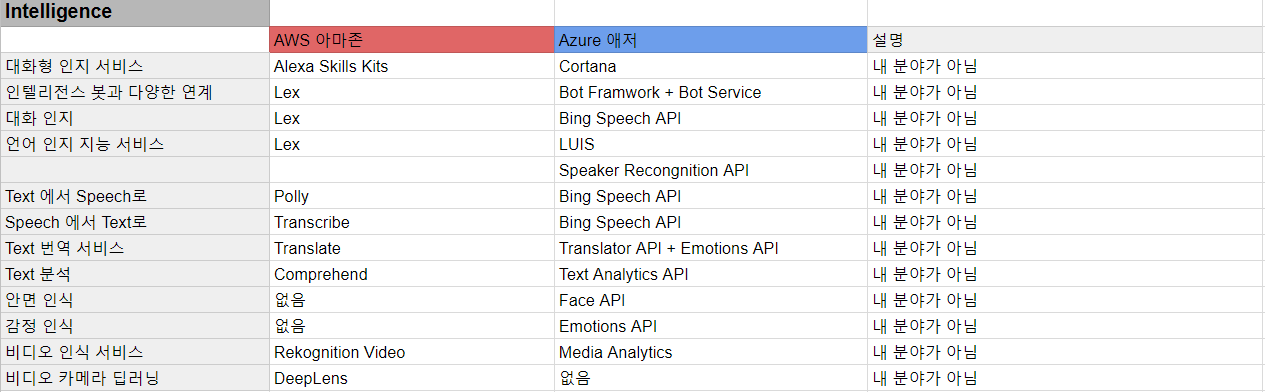
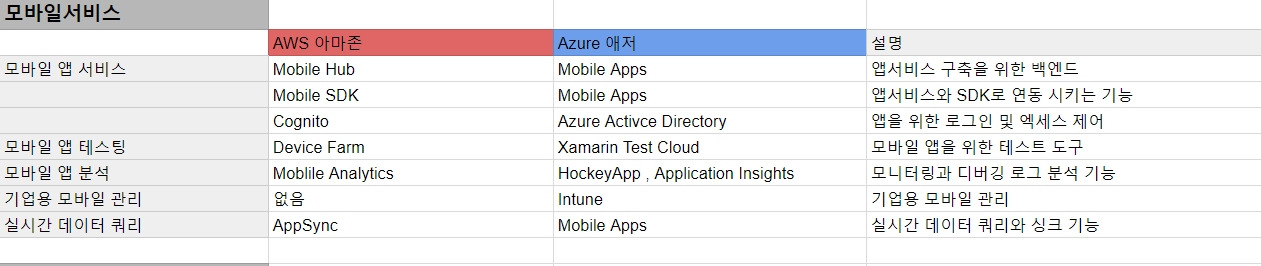
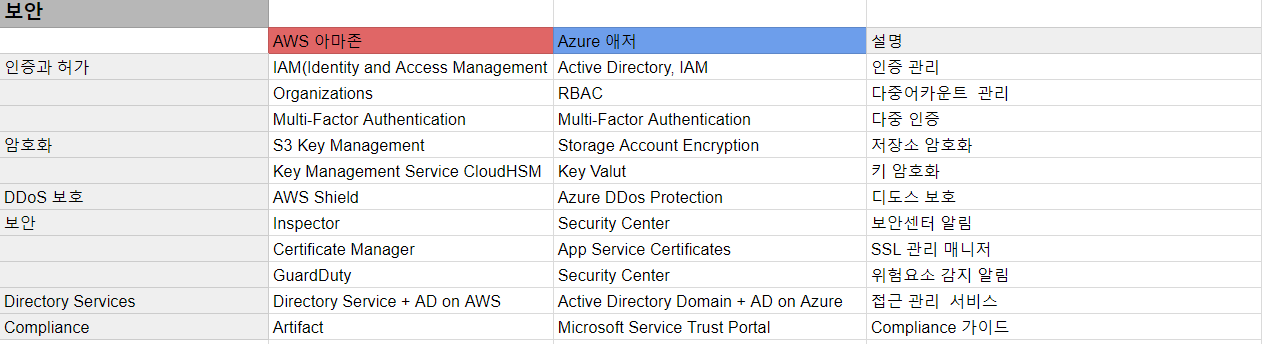
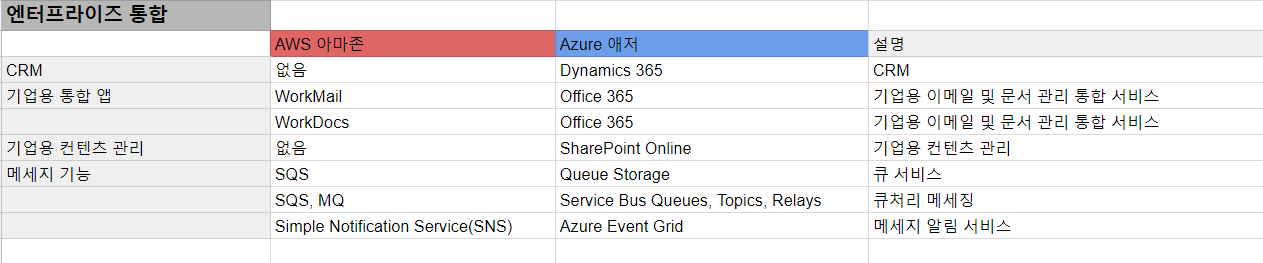
AWS Competitor Service Comparative AWS vs Azure.pdf

첨부파일2 : AWS competitive matrix- Azure- EXTERNAL.PDF


아래는 다른 블로거께서 정리 한 내용입니다.

향후 제가 보기 위해서 출처 포함해서 글 남겨둡니다.


출처 : http://cloud.syncrofusion.com/?page_id=4&uid=226&mod=document


아마존 AWS와 마이크로소프트 Azure의 "비슷한" 기능을 표를 만들어보았다.

하이브리드라는 단어는 온프레미스 + 클라우드 였던 시대에서 이젠 클라우드 + 클라우드 의 변형 형태로 바뀌어 가는 시점인듯하며 이제는 마이크로서비스에서도 클라우드 + 클라우드 등 다른 벤더사의 제품을 원하는데로 혼합해서 써서 디펜던시를 줄이는 부분이 큰 방향으로 흘러가며 한국 시장에서도 몇몇 큰 회사들은 이미 이런 형태로 쓰고 있다. 그렇지만 많은 벤더들이 그러하듯 다 자기만의 용어로 제품을 만들고 수백개의 제품이 있어서 서로 혼돈스러울때가 있다. 그래서 원래 이런 자료는 많이 있는거지만 2018 년 최신을 한번 만들어보았으며 다른 여러개의 자료들을 혼합했다. 제품의 기능이 완벽히 같지 않기 때문에 같은 분야 및 비슷한 기능을 엮었기 때문에 잘못된 자료도 있을수 있다.


Posted by 비내리는사막
, |

AWS Aurora Failover시 설정과 관련하여 이슈사항 및 참고사항에 대하여 공유드립니다.


프로젝트를 진행하시다 보면 AWS Aurora를 이용하여 진행하는 사이트도 있을텐데 Database Failover 테스트시

WAS단에서 Connection들이 정상적으로 Failover 되지 않는 현상이 있습니다.(Write불가, Read만 가능)


위의 문제로 이슈가 발생했고 해결한 내용에 대하여 공유드립니다.


-       테스트 장비

Aurora Master DB 1, Read-Replica 1

Connection : Min(50), Max(50)

-       테스트 상황

1.     Master -> Read-replica Failover

2.     Read-replica(1번 작업진행 후) -> Master Failover

위의 2가지 시나리오대로 진행 후 WAS에서 정상적으로 Application 동작여부 체크

-       이슈 사항

- DB는 정상적으로 Failover 되었음에도 Application에서는 Read-replica 쪽 디비를 바라보고 있음.


해결방안

1.     AWS Aurora Mysql JDBC를 사용하면 안되고, 반드시 Maria JDBC를 사용할것을 권장드립니다.

JAVA설치 후 .JAR 파일을 추가시 JAVA/lib 폴더 밑에 Mysql JDBC파일과 Maria JDBC파일이 같이 존재하면 LIB 파일간의 충돌이 일어날 가능성이 많음

JDBC_DIRVER설정을 Maria로 선언 하여도 2개가 존재하면 driver간의 충돌이 일어나는 현상이 있습니다.

2.     JVM TTL값을 60부터 그이상으로 설정하기를 권장드립니다.(Default : 10)

WAS엔진 종류에 따라서 NETWORKADDRESS_CACHE_TTL의 작동 방식이 다릅니다.

Tomcat의 경우 설정시간에 따라 성공시 Cache를 하지만, 그 외 엔진들은 설정시간마다 Cache를 진행하는 방식인듯 합니다.

어떠한 엔진이 1 Cache를 하고 매번 Cache를 하는지는 Test해보진 않았지만 위 2가지 방식으로 동작합니다.

Amazone의 공식 매뉴얼 : https://docs.aws.amazon.com/ko_kr/sdk-for-java/v1/developer-guide/java-dg-jvm-ttl.html


결론

           Aurora Failover될떄 클러스터엔드포인트에 맵핑된 IP변환이 시간과 TTL에 설정된 시간이 맞지 않아서 발생하는 문제인듯 합니다.

           AWS매뉴얼에도 보면 TTL값을 60초 미만으로 설정하라고 되어 있지만 40부터 설정을 바꿔가며 테스트 해봤는데 60초가 적당한 듯 합니다.


'Cloud > AWS' 카테고리의 다른 글

CentOS root volume Resize  (0) 2018.02.09
AWS 스터디 및 공부방법 링크  (0) 2016.11.22
[AWS] RDS Root 권한 획득  (0) 2016.01.29
[AWS] Auto Scaling Group내 AMI, Instance Type 변경하기  (0) 2016.01.13
[AWS] Region간 Migrion 방법론  (0) 2016.01.10
Posted by 비내리는사막
, |

CentOS root volume Resize

Cloud/AWS / 2018. 2. 9. 11:47

EC2 의 CENTOS 의 경우 8G 정도의 Root 볼륨이 할당됩니다. 약간 작아 20G로 resize2fs 시켜 사용중이었는데 6.7 버전부터 resizefs /dev/xvda1 을 하면 

The filesystem is already 2096896 blocks long.  Nothing to do!

라는 메세지가 발생합니다.

이를 해결하기 위해 아래의 방법을 실행합니다.

 이는 시작 섹터를 변경하여  이전 파티션을 삭제하고 동일한 파티션 번호를 새로 생성하게 하는 것입니다. 잘못될 경우 부팅에 실패할 수 있으므로, 사용 중인 시스템에서는 백업이 필수라 여겨집니다. 


[root@cateye ~]$ lsblk 

NAME    MAJ:MIN RM SIZE RO TYPE MOUNTPOINT

xvda    202:0    0  20G  0 disk 

└─xvda1 202:1    0   8G  0 part /

[root@cateye ~]# resize2fs /dev/xvda1

resize2fs 1.41.12 (17-May-2010)

The filesystem is already 2096896 blocks long.  Nothing to do!


[root@cateye ~]# resize2fs /dev/xvda

resize2fs 1.41.12 (17-May-2010)

resize2fs: Device or resource busy while trying to open /dev/xvda

Couldn't find valid filesystem superblock.

[root@cateye ~]# df -h

Filesystem      Size  Used Avail Use% Mounted on

/dev/xvda1      7.8G  943M  6.5G  13% /

tmpfs           938M     0  938M   0% /dev/shm

[root@cateye ~]# fdisk /dev/xvda


WARNING: DOS-compatible mode is deprecated. It's strongly recommended to

         switch off the mode (command 'c') and change display units to

         sectors (command 'u').


Command (m for help): u

Changing display/entry units to sectors


Command (m for help): p


Disk /dev/xvda: 21.5 GB, 21474836480 bytes

255 heads, 63 sectors/track, 2610 cylinders, total 41943040 sectors

Units = sectors of 1 * 512 = 512 bytes

Sector size (logical/physical): 512 bytes / 512 bytes

I/O size (minimum/optimal): 512 bytes / 512 bytes

Disk identifier: 0x00057cbb


    Device Boot      Start         End      Blocks   Id  System

/dev/xvda1   *        2048    16777215     8387584   83  Linux


Command (m for help): d

Selected partition 1


Command (m for help): n

Command action

   e   extended

   p   primary partition (1-4)

p

Partition number (1-4): 1

First sector (63-41943039, default 63): 2048

Last sector, +sectors or +size{K,M,G} (2048-41943039, default 41943039): ENTER

Using default value 41943039


Command (m for help): p


Disk /dev/xvda: 21.5 GB, 21474836480 bytes

255 heads, 63 sectors/track, 2610 cylinders, total 41943040 sectors

Units = sectors of 1 * 512 = 512 bytes

Sector size (logical/physical): 512 bytes / 512 bytes

I/O size (minimum/optimal): 512 bytes / 512 bytes

Disk identifier: 0x00057cbb


    Device Boot      Start         End      Blocks   Id  System

/dev/xvda1            2048    41943039    20970496   83  Linux


Command (m for help): a

Partition number (1-4): 1


Command (m for help): w

The partition table has been altered!


Calling ioctl() to re-read partition table.


WARNING: Re-reading the partition table failed with error 16: Device or resource busy.

The kernel still uses the old table. The new table will be used at

the next reboot or after you run partprobe(8) or kpartx(8)

Syncing disks.


[root@cateye ~]# reboot


Broadcast message from root@cateye


[root@cateye ~]$ lsblk 

NAME    MAJ:MIN RM SIZE RO TYPE MOUNTPOINT

xvda    202:0    0  20G  0 disk 

└─xvda1 202:1    0  20G  0 part /

[root@cateye ~]$ df -h

Filesystem      Size  Used Avail Use% Mounted on

/dev/xvda1       20G  947M   18G   5% /

tmpfs           938M     0  938M   0% /dev/shm


위의 내용은 제가 직접 실행한 내용이고, 아래에 설명을 따라했습니다. 가급적이면 원본 사이트에가서 참조하시기 바랍니다.


To expand on JD's self-accepted answer, here's exactly what to do:

df -h #print the name of your boot partition

lsblk #show info on all your block devices

You'll see from that output what the name of the disk is of your root partition. For example, you probably see something like this:  xvde 202:64 0 32G 0 disk └─xvde1 202:65 0 8G 0 part /

Our goal is to make xvde1 use the whole available space from xvde. Here's how your resize your partition:

fdisk /dev/xvda (the disk name, not your partition) This enters into the fdisk utility.

  1. u #Change the display to sectors
  2. p #Print info
  3. d #Delete the partition
  4. n #New partition
  5. p #Primary partition
  6. 1 #Partition number
  7. 2048 #First sector
  8. Press Enter to accept the default
  9. p #Print info
  10. a #Toggle the bootable flag
  11. 1 #Select partition 1
  12. w #Write table to disk and exit

Now, reboot your instance: reboot

After it comes back do:

resize2fs /dev/xvde1 (the name of your partition, not the block device)

And finally verify the new disk size: df -h

1 출처는 여기

http://stackoverflow.com/questions/26770655/ec2-storage-attached-at-sda-is-dev-xvde1-cannot-resize

Posted by 비내리는사막
, |

최근에 달린 댓글

글 보관함