블로그 이미지
분무기로 구름을 만들어 비가 내리다. 비내리는사막

카테고리

분류 전체보기 (28)
Cloud (9)
IT용어 (1)
뽐뿌 (1)
개인 (1)
Total
Today
Yesterday

달력

« » 2024.5
1 2 3 4
5 6 7 8 9 10 11
12 13 14 15 16 17 18
19 20 21 22 23 24 25
26 27 28 29 30 31

공지사항

최근에 올라온 글

JSP / JAVA


https://github.com/worldline/healthcheck/blob/master/healthcheck/healthcheck-servlet/src/test/java/net/atos/xa/healthcheck/servlet/RegisterHealthCheckTestCase.java


출처 : http://docs.rightscale.com/faq/How_Do_I_Set_Up_a_Health_Check_Page_for_HAProxy.html


Background

This document explains how to create a health-check page that HAProxy will use to check the status of a web server or application.

While the exact contents of your health-check page are not important, its name should be unique (e.g. including a random number). The same page is used for all application servers to determine whether the server is running (up). While you are not prevented from using index.html as the health-check page, this is not recommended. This is because most web sites have an index.html page and, thus, there is a risk that your load balancer will direct client traffic to a web site other than your own in the cloud. For this reason, you should always use a health-check URI with a unique file name.

Example: The Amazon EC2 cloud recycles IP addresses; so, if one server was terminated and another launched for a different site—with the same IP address and page name as your health-check page name (specified in your HEALTH_CHECK_URI RightScript input)—HAProxy could consider the server to be running and part of the load-balancer pool even though it is someone else's, and direct traffic to it.

Answer

Follow the steps below to set up a Health Check Page for HAProxy for your application (Tomcat, Rails, PHP).

When following the below examples, substitute occurrences of <######> or ###### with your own unique, random numeric string.

Warning: When specifying a HEALTH_CHECK_URI RightScript input, remember to include the health-check file in your application bundle. For example, in the case of Apache Tomcat, if you set HEALTH_CHECK_URI to /health\_check378923.jsp, remember to include health_check378923.jsp in your WAR file.

Set up a Health Check Page

Apache Tomcat

  1. Create a file named health_check<######>.jsp in your application with the following contents.

    <HTML>
      <HEAD>
        <TITLE>Hello World</TITLE>
      </HEAD>
      <BODY>
        <H1>Hello World</H1>
        Today is: <%= new java.util.Date().toString() %>
      </BODY>
    </HTML>
    
  2. Set your HEALTH_CHECK_URI script input to:

    /health\_check_<######>_.jsp

Ruby on Rails/Mongrel

  1. Create a file named mongrel_health_check.rb with the below contents, and add it to your server or repository.

    ####
    # Copyright (c) 2011 RightScale, Inc, All Rights Reserved Worldwide.
    #
    # THIS PROGRAM IS CONFIDENTIAL AND PROPRIETARY TO RIGHTSCALE
    # AND CONSTITUTES A VALUABLE TRADE SECRET. Any unauthorized use,
    # reproduction, modification, or disclosure of this program is
    # strictly prohibited. Any use of this program by an authorized
    # licensee is strictly subject to the terms and conditions,
    # including confidentiality obligations, set forth in the applicable
    # License Agreement between RightScale.com, Inc. and
    # the licensee.
    #
    # Handler for status/health checks.
    # Load balancers (or other machines for that matter) will be able to monitor the health of
    # each mongrel by retrieving a successful response from this handler
    # This file can be included in the configuration of the mongrels (i.e., mongrel_cluster.yml)
    # config_script: lib/mongrel_health_check_handler.rb
    
    # This must be called from a Mongrel configuration...
    class MongrelHealthCheckHandler < Mongrel::HttpHandler
      def initialize
        #Make sure it's expired by the time we process the first request
        @DB_OK_at= Time.at(0)
        @freshness= 30
        @error_msg=""
      end
      def process(request,response)
    
        # Write down if it's time to do a more heavyweight check
        db_stale=true if( (Time.now()-@DB_OK_at).to_i > @freshness )
    
        check_db if db_stale
    
        code = ( (Time.now()-@DB_OK_at).to_i > @freshness )? 500:200
        # Return OK if ActiveRecord is not connected yet (i.e., test mongrel only)
        code = 200 unless ActiveRecord::Base.connected?
    
        response.start(code) do |head,out|
          head["Content-Type"] = "text/html"
    
          t = Time.now()
          out.write "Now: #{t} , DB OK #{(t-@DB_OK_at).to_i}s ago\n"
          out.write "ERROR:#{@error_msg}" if @error_msg != ""
        end
      end
    
      # Check health of DB, and update the @DB_OK_at timestamp if it succeeds
      def check_db
        if ActiveRecord::Base.connected?
          begin      
            ActiveRecord::Base.connection.verify!(0) #verify now (and reconnect if necessary)
            ActiveRecord::Base.connection.select_value("SELECT NOW()")
            @DB_OK_at = Time.now
            @error_msg = ""
          rescue Exception => e
            # Do your logging/error handling here
            @error_msg = e.inspect
          end
        end
      end
    end
    
    uri "/mongrel-status######", :handler => MongrelHealthCheckHandler.new, :in_front => true
    
  2. Modify the last line in the above file so that the page can be uniquely identified with your application (e.g. change mongrel-status_######_ to mongrel-status1234089).

  3. Add the following to /etc/mongrel_cluster/mongrel_cluster.yml:
    config\_script:&nbsp; _<PathToFile>_/mongrel\_health\_check.rb Or, alternatively, set your OPT_MONGREL_CONFIG_SCRIPT input to the path where you saved the above file. Be sure to specify the full path to the file from the base directory of your Rails application; e.g. lib/mongrel\_health\_check\_handler.rb.

  4. Set HEALTH_CHECK_URI to the value you specified at the end of the file above: /mongrel-status_<######>_

PHP

  1. Create a file named health_check_<######>_.php in your application with the following contents.

    <?php
    phpinfo();
    ?>
    
  2. Set  OPT_HEALTH_CHECK_URI to: /health_check_<######>_.php

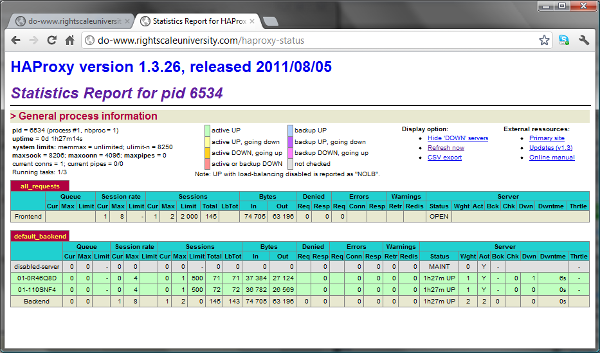
Verify Health Check Pages

If your site's permissions allow it (and assuming that your script input OPT_LB_STATS_URI is set to haproxy-status) you can simply add /haproxy-status to your load-balancer hostname URL to display an HAProxy status report in a tabular HTML format:

Example: http://www.mysite.com/haproxy-status

faq-HAProxyStatus.png

Posted by 비내리는사막
, |

RPM 패키지는 존재하지만, debian (ubuntu)계열에서 사용되는 deb 패키지가 존재하지 않는 경우가 있다. 


이 경우는 alien 패키지를 통해서 변환해서 사용 할 수 있다.


  • alien : rpm 패키지를 Debian 패키지로 변환하는 툴

# alien package installation 

sudo apt-get install -y alien


rpm 패키지가 존재하는 곳으로 이동하거나, 절채경로 입력

sudo alien --scripts -d oracle-xe-11.2.0-1.0.x86_64.rpm


* 변환시간이 일정시간 소요 된다. (사양에 따라 다르지만, 기다림을 필요)


아래처럼 deb 파일이 생성 되는 것을 확인 할 수 있다.

oracle-xe-11.2.0-1.0.x86_64.rpm

oracle-xe_11.2.0-2_amd64.deb


# deb install

dpkg-i oracle-xe_11.2.0-2_amd64.deb


Posted by 비내리는사막
, |

출처 : http://zetawiki.com/wiki/%EB%A6%AC%EB%88%85%EC%8A%A4_sudo_%ED%8C%A8%EC%8A%A4%EC%9B%8C%EB%93%9C_%EC%97%86%EC%9D%B4_%EC%82%AC%EC%9A%A9


방법[편집]

사용자명 ALL=NOPASSWD: ALL
→ 여기서 NOPASSWD:를 빼면 sudo 실행시 자신의 패스워드를 입력해야만 함
사용자명 ALL=NOPASSWD: 명령어1, 명령어2
→ 지정한 명령어들만 sudo 사용가능

실습 1: 모든 명령어 사용가능[편집]

  • 신규 계정 testuser1 생성
[root@localhost ~]# useradd testuser1
[root@localhost ~]# echo 'P@ssw0rd1' | passwd --stdin testuser1
Changing password for user testuser1.
passwd: all authentication tokens updated successfully.
[root@localhost ~]# cat /etc/passwd | grep testuser1
testuser1:x:500:500::/home/testuser1:/bin/bash
  • testuser1 sudo 권한 추가(+NOPASSWD)
[root@localhost ~]# echo 'testuser1 ALL=NOPASSWD: ALL' >> /etc/sudoers
[root@localhost ~]# cat /etc/sudoers | tail -2
#includedir /etc/sudoers.d
testuser1 ALL=NOPASSWD: ALL
  • testuser1 계정으로 sudo 실행
[root@localhost ~]# su - testuser1
[testuser1@localhost ~]$ reboot
reboot: Need to be root
[testuser1@localhost ~]$ sudo reboot
The system is going down for reboot NOW!
→ 패스워드 입력 없이 sudo reboot 가능

실습 2: 지정한 명령어만 사용가능[편집]

[root@localhost ~]# visudo
변경 전
... (생략)
#includedir /etc/sudoers.d
testuser1 ALL=NOPASSWD: ALL
변경 후
... (생략)
#includedir /etc/sudoers.d
testuser1 ALL=NOPASSWD: /usr/sbin/useradd, /usr/sbin/userdel
[root@localhost ~]# cat /etc/sudoers | tail -2
#includedir /etc/sudoers.d
testuser1 ALL=NOPASSWD: /usr/sbin/useradd, /usr/sbin/userdel
  • testuser1 계정으로 sudo 실행 테스트
[root@localhost ~]# su - testuser1
[testuser1@localhost ~]$ sudo reboot
[sudo] password for testuser1: 
Sorry, user testuser1 is not allowed to execute '/sbin/reboot' as root on localhost.localdomain.
→ sudo reboot에 대해서는 패스워드 물어본다.
→ 자신의 패스워드(P@ssw0rd1)를 정확히 입력해도 권한없어 실행불가
[testuser1@localhost ~]$ sudo useradd mallory
[testuser1@localhost ~]$ cat /etc/passwd | grep mallory
mallory:x:501:501::/home/mallory:/bin/bash
→ sudo useradd에 대해서는 패스워드 입력 없이 실행가능


Posted by 비내리는사막
, |

최근에 달린 댓글

글 보관함